

How To Repair A Depth Gauge
In this post, you'll learn what is Vernier depth approximate and It'due south working, parts, types, to the lowest degree count and errors.
Vernier Depth Gauge
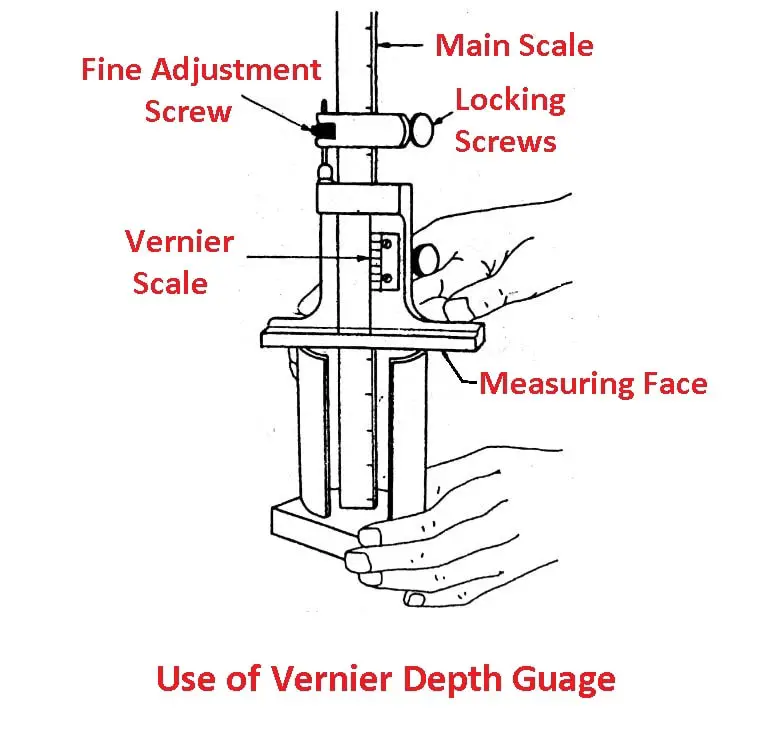
Vernier depth estimate is used for measuring the depth of holes, recesses and distances from a plane surface to a projection. Here the graduated scale is slide through the base and vernier scale remains fixed.
Running through the depth approximate body is the main calibration the cease of which provides the datum surface from which measurements are taken.
The depth estimate is made precisely so that the axle is perpendicular to the base in both directions. The stop of the axle is square and flat similar the cease of the steel dominion and the base is flat and true, free from curves or waviness.
It has the advantage of having a big measuring range without having to resort to the use of extension rods as compared to depth micrometer.
Read also: Vernier Caliper: Parts, Types, Working Principle, Least Count, Errors and More
Parts of Vernier Depth Gauge
Following are the unlike parts of vernier depth gauge:
- Main calibration
- Vernier calibration
- Locking screw
- Fine adjustment screw
- Movable head
- Measuring face
Types of Vernier Depth Gauge
Post-obit are the 2 different types of depth estimate:
- Analog type
- Digital type
Least Count of Depth Gauge
Following are the least count of depth gauge:
- The least count of analog depth gauge is 0.02 mm
- The to the lowest degree count of digital blazon depth approximate is 0.01 mm
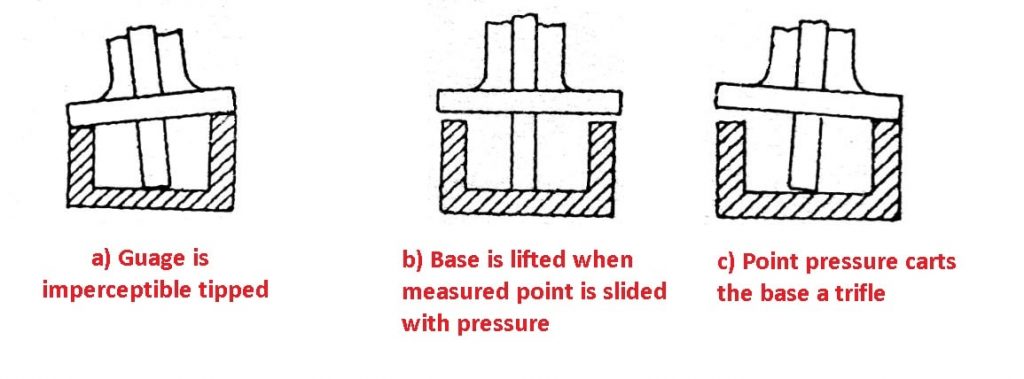
Errors in Using the Depth Gauge
The near common errors are listed beneath:
- Approximate is imperceptibly tipped.
- The base is liſted when a measured point is slid with force per unit area.
- Indicate pressure carts the base a trifle.
The to a higher place situations are shown in the figure below:
Steps for Using Depth Approximate
- Thoroughly make clean and inspect the attachment.
- Fasten it to the movable jaw.
- Set the depth gauge rod with its end in contact with the surface plate.
- Write down the reading, exercise not depend on memory.
- Heighten the movable jaw to clear the obstruction on the office.
- Place top gauge in position and lower movable jaw until rod of the depth gauge contacts the measured bespeak of the part characteristic.
- Note the reading. The difference between this reading and the reading in stride 4 is the height of the measured signal above the reference surface.
That'southward information technology, thanks for reading. If you find this article helpful delight share this with your friends. If you take whatever questions ask in the comment I'll respond to yous.
Read As well:
- Vernier Tiptop Judge: Parts, Specification, Errors, Precaution
- Micrometer Screw Gauge and Types of Micrometers [The Consummate Guide]

Source: https://www.theengineerspost.com/vernier-depth-gauge/
Posted by: chamberlainbersoones.blogspot.com
0 Response to "How To Repair A Depth Gauge"
Post a Comment